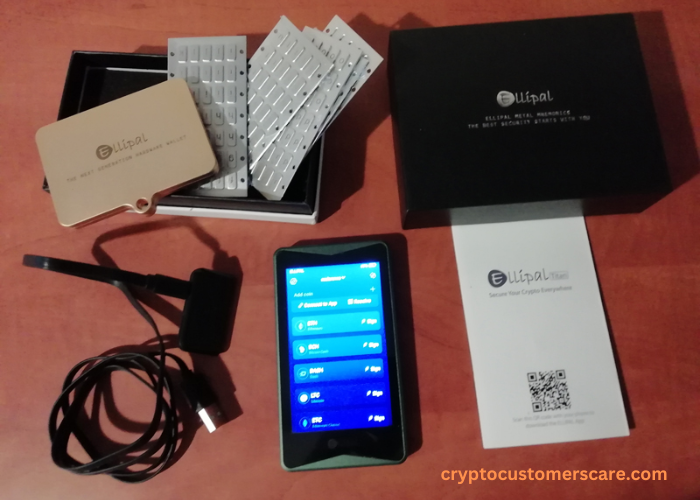
Cryptocurrency is becoming increasingly popular as a form of digital currency. With its rising popularity, it is crucial for individuals to adopt secure and reliable wallets to store their digital assets. One such wallet that has gained recognition in the crypto community is the Ellipal Wallet. In this article, we will explore the process of setting up the Ellipal Wallet and discuss its features, benefits, and steps to ensure the security of your digital assets.
Why Choose Ellipal Wallet?
When it comes to selecting a cryptocurrency wallet, security should be the top priority. The Ellipal Wallet offers a high level of security that is essential for protecting your digital assets. Unlike online wallets, the Ellipal Wallet is an offline hardware wallet, which means your private keys are stored offline and are not vulnerable to hacking attempts. This significantly reduces the risk of your funds being compromised.
Another reason to choose the Ellipal Wallet is its user-friendly interface. The wallet is designed to be simple and intuitive, making it accessible even for beginners in the cryptocurrency world. The Ellipal Wallet also supports a wide range of cryptocurrencies, ensuring that you can store all your digital assets in one secure place.
Features of Ellipal Wallet
Before diving into the setup process, let’s take a closer look at the features that make the Ellipal Wallet stand out from other cryptocurrency wallets:
- Offline storage: The Ellipal Wallet is a hardware wallet that stores your private keys offline. This ensures that your funds are protected from online threats such as hacking attempts and phishing attacks.
- Air-gapped technology: The wallet utilizes air-gapped technology, which means it is not connected to the internet during transactions. This further enhances the security of your digital assets by minimizing the risk of online attacks.
- Multi-currency support: Ellipal Wallet supports a wide range of cryptocurrencies, including Bitcoin, Ethereum, Ripple, and many more. This allows you to store all your digital assets in one place, eliminating the need for multiple wallets.
- Easy-to-use interface: The user-friendly interface of the Ellipal Wallet makes it simple for both beginners and experienced users to navigate and manage their digital assets.
Step-by-step guide to setting up Ellipal Wallet
Now that we understand the benefits and features of the Ellipal Wallet, let’s dive into the step-by-step guide to setting up your own Ellipal Wallet.
Creating a new wallet
To begin, follow these steps to create a new wallet on your Ellipal device:
Step 1: Power on your Ellipal Wallet and select “Create New Wallet” from the menu.
Step 2: The wallet will generate a 12-word mnemonic phrase. Write down this phrase on a piece of paper and store it in a secure location. This phrase serves as a backup in case you lose access to your wallet.
Step 3: Confirm the mnemonic phrase by entering the words in the correct order.
Step 4: Set a strong password for your wallet. Make sure to use a combination of uppercase and lowercase letters, numbers, and special characters.
Step 5: Congratulations! You have successfully created a new wallet on your Ellipal device. Make sure to keep your mnemonic phrase and password safe and secure.
Backing up your wallet
Backing up your wallet is crucial to ensure that you can recover your funds in case your Ellipal device is lost, stolen, or damaged. Here’s how you can backup your Ellipal Wallet:
Step 1: On your Ellipal device, select “Backup” from the menu.
Step 2: Follow the instructions on the screen to enter your password and confirm the backup process.
Step 3: The wallet will generate a backup file. Make sure to save this file in a secure location, preferably offline or on a hardware device such as a USB drive.
Step 4: Congratulations! You have successfully backed up your Ellipal Wallet. Remember to keep your backup file safe and secure.
Adding and managing cryptocurrencies in Ellipal Wallet
Now that you have set up your Ellipal Wallet and ensured its backup, let’s explore how you can add and manage different cryptocurrencies in your wallet.
Step 1: Power on your Ellipal Wallet and select “Manage Wallet” from the menu.
Step 2: Connect your Ellipal device to your computer using the provided USB cable.
Step 3: Open the Ellipal App on your computer and follow the instructions to connect your device.
Step 4: Once connected, you will be able to see a list of supported cryptocurrencies. Select the cryptocurrencies you want to add to your wallet.
Step 5: Confirm the transaction on your Ellipal device and wait for the transaction to be completed.
Step 6: Congratulations! You have successfully added and managed cryptocurrencies in your Ellipal Wallet. You can now securely store and transact with your digital assets.
Securing your Ellipal Wallet
Security is paramount when it comes to storing and managing your digital assets. Here are some additional steps you can take to enhance the security of your Ellipal Wallet:
- Enable passphrase: The Ellipal Wallet allows you to set up a passphrase in addition to your password. This adds an extra layer of security by requiring both the passphrase and password to access your wallet.
- Keep your firmware updated: Ellipal regularly releases firmware updates that include security enhancements and bug fixes. Make sure to keep your firmware up to date to benefit from the latest security features.
- Use strong passwords: Avoid using simple or easily guessable passwords for your Ellipal Wallet. Instead, opt for long and complex passwords that include a combination of letters, numbers, and special characters.
- Be cautious of phishing attempts: Always double-check the URL of the Ellipal website or app before entering your sensitive information. Be wary of phishing attempts that try to trick you into revealing your wallet credentials.
Troubleshooting Common Issues With Ellipal Wallet
While the Ellipal Wallet is designed to be user-friendly, you may encounter some common issues during setup or usage. Here are a few troubleshooting tips to help you resolve these issues:
- Device not recognized: If your Ellipal device is not recognized by your computer, try using a different USB cable or connecting to a different USB port. You can also try restarting your computer and reconnecting the device.
- Forgotten password: If you forget your wallet password, you can reset it by restoring your wallet using the mnemonic phrase. Make sure you have your backup file and mnemonic phrase handy before attempting to reset your password.
- App not working: If the Ellipal App is not working properly, try uninstalling and reinstalling the app on your computer. If the issue persists, check for any available updates for the app and install them.
Conclusion
Setting up the Ellipal Wallet is a straightforward process that ensures the security and convenience of managing your digital assets. By following the step-by-step guide outlined in this article, you can create a new wallet, backup your wallet, add and manage cryptocurrencies, and secure your Ellipal Wallet effectively. Remember to keep your mnemonic phrase, password, and backup file safe and secure at all times. With its offline storage, air-gapped technology, and user-friendly interface, the Ellipal Wallet provides a reliable and secure solution for cryptocurrency storage. Take the necessary steps to protect your digital assets and enjoy the peace of mind that comes with using the Ellipal Wallet.